Categories
ai cloud

Amazon Bedrock Knowledge Base – Part 3 (SDK)

Since the last writeup, AWS has added support for Anthropic Claude 3 model to AWS Bedrock Knowledge Base (ABKB). It has also added the ability to add your own metadata to your source files in order to perform filtering when doing query. For example, you may want to add a metadata to a certain set of files to indicate that they are from year 2023. Then during your query, you can include a filter to indicate you only want to use data from year 2023. This provides another set of tools for developers to create more relevant and targeted query. Note that filtering is only supported for FAISS vector engine.

If you’re looking to integrate ABKB into your code, there are two primary methods: using one of the AWS SDK or interacting through HTTP API. In this article, we will be using Boto3, the AWS SDK for Python. Here is a simple example to do a retrieve and generate query using Boto3. This example uses the new Claude 3 Sonnet model.

import boto3
import json

AWS_ACCESS_KEY="_your_access_key_"
AWS_SECRET_KEY="_your_secret_key_"
REGION_NAME="_your_region_"

client = boto3.client('bedrock-agent-runtime',
                      aws_access_key_id=AWS_ACCESS_KEY,
                      aws_secret_access_key=AWS_SECRET_KEY,
                      region_name=REGION_NAME
)

# retrieval and generate
response = client.retrieve_and_generate(
    input={
        'text': 'how to apply for leave'
    },
    retrieveAndGenerateConfiguration={
        'knowledgeBaseConfiguration': {
            'knowledgeBaseId': 'LEBQPJQ9BY',
            'modelArn': 'arn:aws:bedrock:us-east-1::foundation-model/anthropic.claude-3-sonnet-20240229-v1:0',
            'retrievalConfiguration': {
                'vectorSearchConfiguration': {
                    'overrideSearchType': 'HYBRID'
                }
            }
        },
        'type': 'KNOWLEDGE_BASE'
    }
)

print(json.dumps(response))

The output in JSON:

{
  "ResponseMetadata": {
		...trimmed...
  },
  "citations": [
    {
      "generatedResponsePart": {
        "textResponsePart": {
          "span": {
            "end": 705,
            "start": 364
          },
          "text": "...trimmed..."
        }
      },
      "retrievedReferences": [
        {
          "content": {
            "text": "...trimmed..."
          },
          "location": {
            "s3Location": {
              "uri": "s3://...trimmed..."
            },
            "type": "S3"
          }
        }
      ]
    }
  ],
  "output": {
    "text": "To apply for leave as an employee on the Workday mobile app:\n\n1. Navigate to your Workday Mobile Homepage and select 'View Applications' under 'Frequently Used'\n2. Select 'Time Off'\n3. Select the date(s) you want to apply for leave\n4. Select 'Next' and choose the leave type\n5. Select any required reasons or upload attachments if applicable\n6. Submit the request To apply for leave as an employee on the Workday desktop:\n\n1. Go to the Workday Homepage and select the 'Absence' worklet\n2. Under 'Request', select 'Request Absence'\n3. Select the date(s) for the leave and click 'Request Absence'\n4. Choose the leave type\n5. Select 'Next' and provide any required reasons or attachments\n6. Submit the request"
  },
  "sessionId": "c8332417-df3c-41e5-8516-ad38cc09de15"
}

For this simple task there is no much difference in output from the various Claude models.

This concludes the three-part series on ABKB. I’ve covered everything from creating the knowledge base, testing it in the playground, to executing queries via CLI and SDK.

Categories
ai cloud

Amazon Bedrock Knowledge Base: Part 2 (CLI)

In Part 1, I showed how you can set up an Amazon Bedrock Knowledge Base (ABKB for short) using the AWS console. I also showed how you can perform queries against the knowledge base via the playground in AWS console. In this article, I will show how you can do the same thing via AWS CLI.

First, make sure you are using the latest version of the CLI. Otherwise some commands might not be available. To see if your CLI supports the commands, run

aws bedrock-agent-runtime help

It should return something like this:

BEDROCK-AGENT-RUNTIME()                                BEDROCK-AGENT-RUNTIME()


NAME
       bedrock-agent-runtime -

DESCRIPTION
       Amazon Bedrock Agent

AVAILABLE COMMANDS
       o help

       o retrieve

       o retrieve-and-generate

Next, make sure you have the access and secret keys configured in AWS CLI. You can do it via the usual aws configure but I usually do it in a profile since I have many AWS accounts/IAM users, eg. aws configure --profile demo. For convenience, I will use alias to use the new profile like this: alias aws='aws --profile=demo --region=us-east-1'

We can now test the retrieve command in CLI. To run the command, you will need the knowledge base ID. Strangely, there is no way to get this via the CLI 🤷.For now just copy the value from AWS console. Once that is done, you are ready to run the CLI command. Omitting optional/default parameters, this is an example of the simplest version of the command:

aws bedrock-agent-runtime retrieve \
--knowledge-base-id LEBQPJQ9BY \
--retrieval-query '{ "text": "how to apply for leave" }'

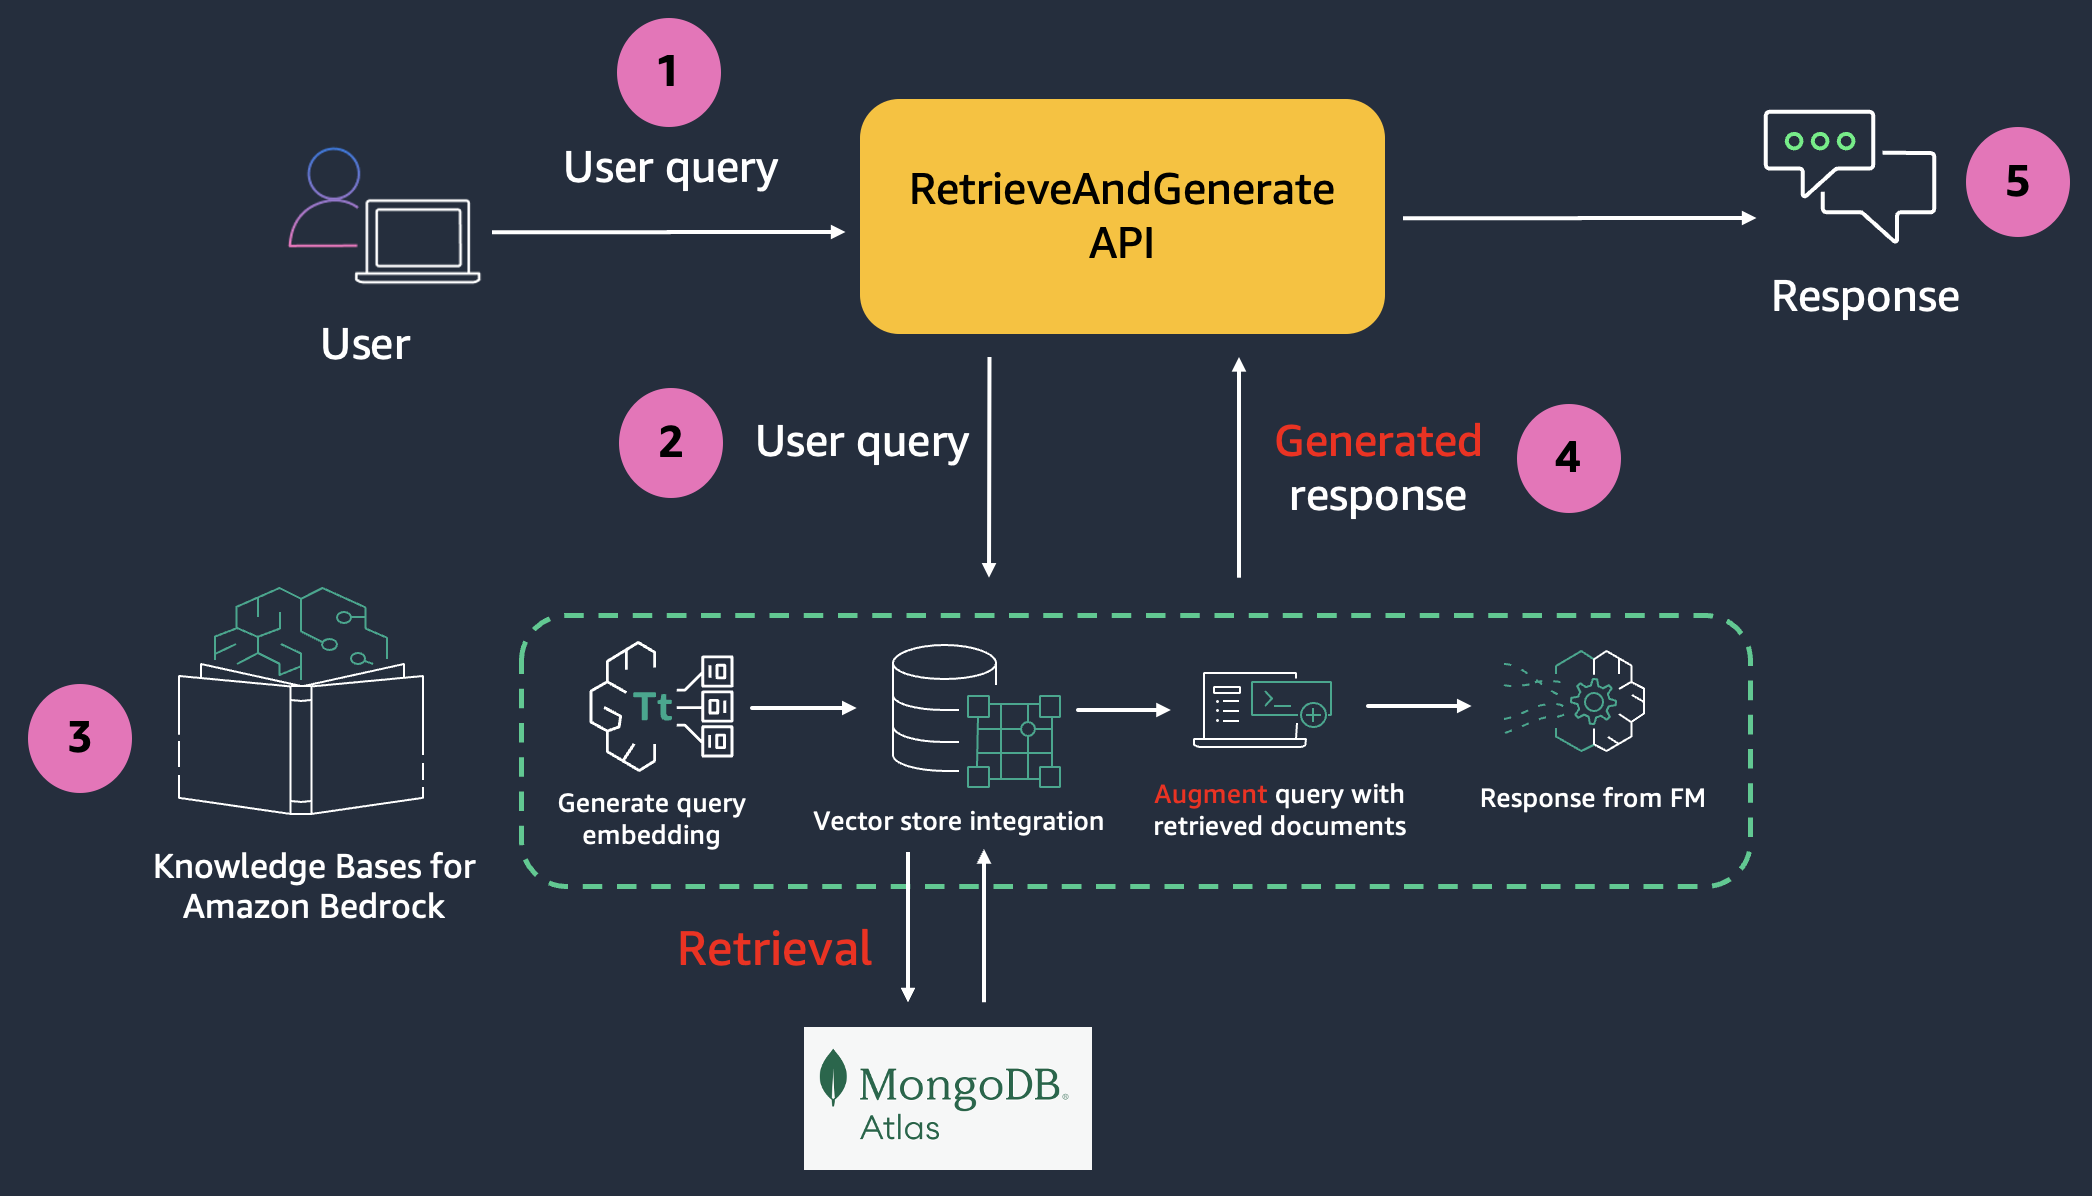
Retrieve performs a vector search using the query text and returns a list of matches with a score. As mentioned in Part 1, if you are implementing a custom RAG workflow, you can use the output of retrieve as the context for further prompting. Score ranges from 0-1, 1 being most relevant.

{
    "retrievalResults": [
        {
            "content": {
                "text": "<trimmed>"
            },
            "location": {
                "type": "S3",
                "s3Location": {
                    "uri": "s3://<trimmed>"
                }
            },
            "score": 0.75545114
        },
        {
            "content": {
                "text": "<trimmed>"
            },
            "location": {
                "type": "S3",
                "s3Location": {
                    "uri": "s3://<trimmed>"
                }
            },
            "score": 0.7345349
        },

(Note: output trimmed for brevity and sanitization)

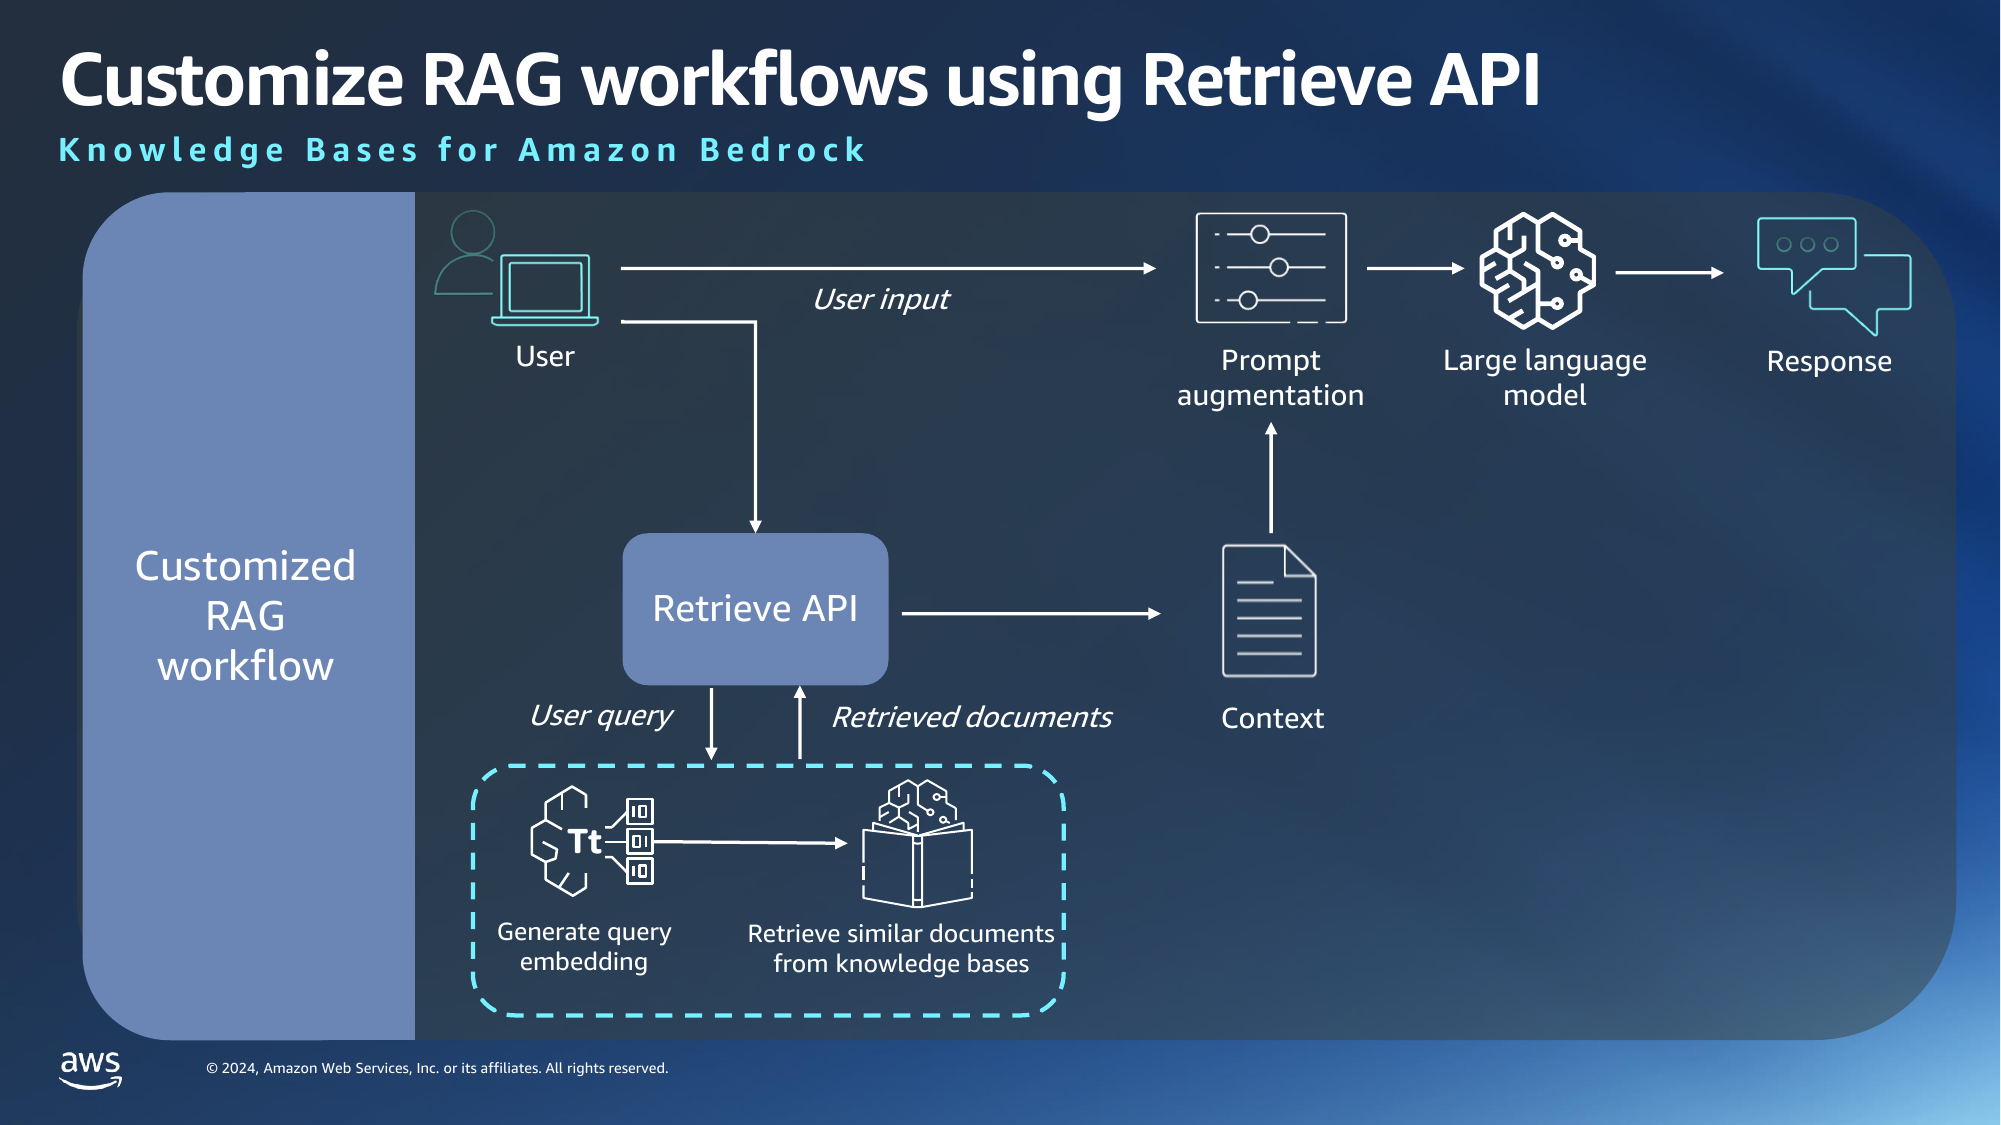
Next we will test retrieve-and-generate command, which implements the fully managed RAG workflow.

Unlike some other CLI commands which uses model id, you will need the model ARN for querying. There is currently no way to get the model ARN from AWS console, so you will need to get it via another CLI command:

aws bedrock list-foundation-models

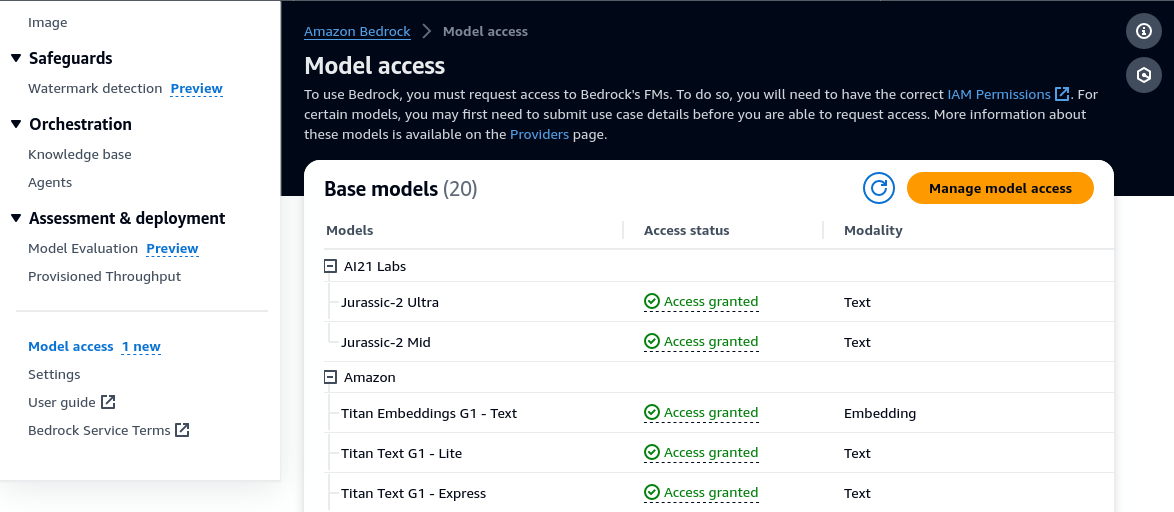
Not all models can be used in ABKB – at least for now. Stick to Claude Instant V1, V2, V2.1 and only use ON_DEMAND models. I made the mistake of choosing a PROVISIONED model and all I get is a cryptic error message. Yikes.

An error occurred (ValidationException) when calling the RetrieveAndGenerate operation: 1 validation error detected: Value 'arn:aws:bedrock:us-east-1::foundation-model/anthropic.claude-instant-v1:2:100k' at 'retrieveAndGenerateConfiguration.knowledgeBaseConfiguration.modelArn' failed to satisfy constraint: Member must satisfy regular expression pattern: (arn:aws(-[^:]+)?:bedrock:[a-z0-9-]{1,20}:(([0-9]{12}:custom-model/[a-z0-9-]{1,63}[.]{1}[a-z0-9-]{1,63}/[a-z0-9]{12})|(:foundation-model/[a-z0-9-]{1,63}[.]{1}[a-z0-9-]{1,63}([.:]?[a-z0-9-]{1,63}))|([0-9]{12}:provisioned-model/[a-z0-9]{12})))|([a-z0-9-]{1,63}[.]{1}[a-z0-9-]{1,63}([.:]?[a-z0-9-]{1,63}))|(([0-9a-zA-Z][_-]?)+)

With the right model ARN in hand, you are ready to execute the retrieve-and-generate command. Here is an example of the command you can execute:

aws bedrock-agent-runtime retrieve-and-generate \
--input '{ "text": "how to apply for leave" }' \
--retrieve-and-generate-configuration '
{
  "knowledgeBaseConfiguration": {
    "knowledgeBaseId": "LEBQPJQ9BY",
    "modelArn": "arn:aws:bedrock:us-east-1::foundation-model/anthropic.claude-instant-v1",
    "retrievalConfiguration": {
      "vectorSearchConfiguration": {
        "overrideSearchType": "HYBRID"
      }
    }
  },
  "type": "KNOWLEDGE_BASE"
}
'

If all goes well, you will get an output like this:

{
    "sessionId": "0ff48086-f26f-4ebd-bb68-7c7bcd1e414a",
    "output": {
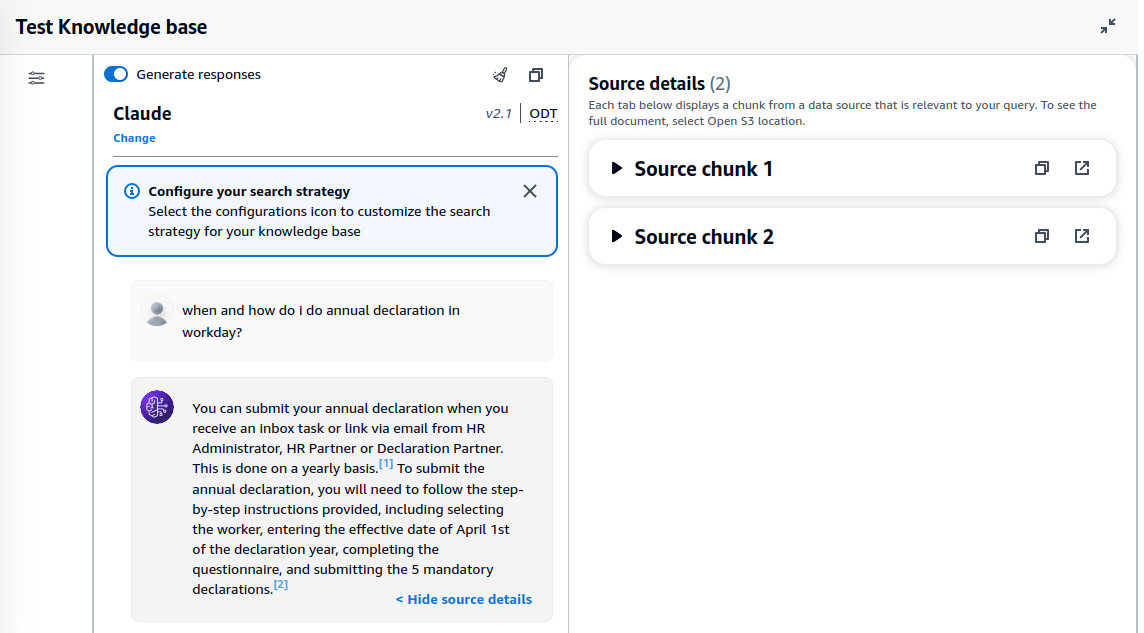
        "text": "To apply for leave, navigate to the Workday homepage and select the Absence worklet. Then select \"Request Absence\" and choose the date range and type of leave you want to apply for. You may need to provide additional details or attachments depending on the leave type. Finally, select \"Submit\" to complete the request."
    },
    "citations": [
        {
            "generatedResponsePart": {
                "textResponsePart": {
                    "text": "<trimmed>",
                    "span": {
                        "start": 0,
                        "end": 317
                    }
                }
            },
            "retrievedReferences": [
                {
                    "content": {
                        "text": "<trimmed>"
                    },
                    "location": {
                        "type": "S3",
                        "s3Location": {
                            "uri": "s3://<trimmed>"
                        }
                    }
                },

In an earlier attempt, I included numberOfResults in vectorSearchConfiguration and got an error message. Note that numberOfResults is currently unsupported.

Closing Thoughts

While writing this article, I noted some general observations in the terms of CLI/console usage:

  • Use of model id vs model ARN: some CLI commands use model id while others use model ARN
  • Some information can only be found in AWS console (eg. knowledge base id), others only via AWS CLI (eg. model ARN)
  • Inconsistent naming in CLI (eg. –retrieve-query vs –input) and error message (error message refers to numResults while actual field is numberOfResults)

Since ABKB is so new there are bound to be some rough edges here and there. None of these are showstoppers and I expect them to clear up over time as the service becomes more mature. For now do be aware as the service undergoes rapid development and updates.

Categories
ai cloud

Amazon Bedrock Knowledge Base: a first look

Amazon Bedrock is a fully managed service designed to simplify the development of generative AI applications – as opposed to Amazon SageMaker which provides services for machine learning applications. It offers access to a growing collection of foundation models from leading AI companies such as AI21 Labs, Anthropic, Cohere, Meta, Mistral AI, Stability AI, and Amazon itself.

One of the latest offering under Amazon Bedrock is Amazon Bedrock Knowledge Base – which I shall refer to as ABKB. Essentially, ABKB is a simple way to do retrieval augmented generation (RAG). RAG is a technique to overcome some of the problems with foundation models (FM), such as not having up-to-date information and lack of knowledge of organization’s own data. Instead of retraining or fine tuning a FM with your own data, RAG allows existing FM to reference those data when responding to a query to improve accuracy and minimize hallucinations. In this article, I will go through the process of setting up ABKB and see how it can be used it in a sample application. But first, let’s look at the 2 ways you can use ABKB in a RAG application:

Custom RAG workflow is useful for cases where you want to have more control over the prompt augmentation process, or where you want to use FM which are not available in AWS. Here, you are only using AWS to generate embeddings – which is a technique to convert words into a numerical form – and to retrieve similar documents from user prompts.

In a fully managed RAG workflow, we will use AWS for all stages of the pipeline and this is what we will be doing.

Things to take note

As it is with new services, Amazon Bedrock is currently available only in limited regions. We will be using the US East (N. Virginia) region.

Note that you will need to login as an IAM user, not root user, to use ABKB. Suffice to say the IAM user will need to have sufficient permissions.

Request model access

Before you can use any Bedrock services, you will need to request for permission to the models that you want to use. This is done under the Model access option on the left panel.

There is no cost to request for model access so you might as well request for everything. The main reason for this step is to make sure you agree to the EULA for each model which will be different for different providers. Access to most models are automatically granted after request, except for Anthropic models, which you will need to provide a use case. You will need to do this because ABKB only supports Anthropic models at this point for its retrieve and generate API.

Create data source

ABKB takes data from a S3 bucket as its data source, so you will need to use or create a S3 bucket. Use the same region as the knowledge base if you are creating a new bucket.

There are some limitations to the size and type of documents supported. Mainly, documents should not exceed 50MB in size and it will only process text in supported documents (txt, md, html, doc, csv, xls, pdf).

Create knowledge base

There are 4 steps to create a knowledge base. Step 1 is straightforward and just involves filling in the name, description and IAM permissions – which you can leave as default.

In Step 2, you will need to specify the data source. By right you should be able to click on [Browse S3] and choose your bucket but it was not working for me. So enter the S3 URI manually if you need to. For chunking strategy you can leave it as default (300 tokens) or customize it according to your needs.

In Step 3, choose your embeddings model and vector database. You can choose between Amazon Titan or Cohere’s model for embedding. There are some articles that says Cohere’s models are superior. You can choose either and evaluate the performance. For vector database you can select Amazon OpenSearch Serverless, Aurora, Pinecone or Redis Enterprise Cloud. For development and testing, OpenSearch Serverless provides the cheapest option.

Step 4 is basically just a confirmation step. Click [Create knowledge base] to confirm. Note that it will take some time to provision the necessary resources after you click. While that is happening, do not close your browser tab. This is quite unusual as provisioning usually takes place in the background and there should not be a need to keep the frontend open, but that is not the case here.

Assuming all goes well, you will see a message to say that the knowledge base has been created successfully. You might have to wait a few more minutes for the vector database to fully index contents from the data source.

Test knowledge base

Now comes the fun part. you can now select your knowledge base and test it in the playground. You can configure the search strategy and model under configuration. Depending on your use case you might want to change the search strategy.

For model selection, Claude Instant provides the fastest response, but it does not perform as well for complex queries. I find almost no difference in Claude 2 and 2.1, but that is probably because my queries do not require a larger context window.

Sample responses

To test ABKB, I uploaded a 238 page employee user guide and use it to ask questions. The first one is a simple question.

Note that the response includes references to source chunks, which are relevant text that are extracted from the data source. You can also expand source chunk to see the actual text.

The second example is one where I asked follow-up questions.

I also tried to ask it something which is not in the document. To which it responded correctly that there is no such information.

Conclusion

Amazon Bedrock Knowledge Base provides an opinionated way to do RAG in a straightforward manner. The knowledge base you create is meant to be integrated into applications via AWS SDK. As it is fairly new at this stage, some rough edges are to be expected. Some of the issues encountered so far includes:

  • Model request UI not straightforward
  • Browse S3 not listing buckets unless they are already a data source
  • Provisioning requires staying on the page
  • Only Anthropic models available for response generation
  • New models like Anthropic 3 not available
  • Failure to create knowledge base happens sometimes

Despite the teething issues, ABKB seems like a useful service for organizations to create RAG applications easily within the AWS ecosystem and I am excited to see the addition of more features to enhance its functionality in the upcoming weeks/months.

Categories
cloud programming sysadmin

How I reduced a WordPress database size by 85% and memory consumption by 20x

I was helping a friend to troubleshoot their e-commerce site. It was running on WordPress using WooCommerce as the e-commerce backend. Like most WordPress sites, it was installed with a ton of plugins. My friend complained that the site performance has been getting slower and slower, to the point where a page load can take anywhere from 2-3 seconds to a failing to load at all. Getting to wp-admin also took forever.

At first, there are a lot of pieces to unravel, since the cause might be anything. The backend was running on AWS. The WordPress site is running as a docker container on the EC2, while the database is running on a RDS instance. It uses Cloudflare tunnel to connect the public hostname to the docker container. Seems like a decent setup.

While I do use WordPress (this site runs on WordPress), I am not a WordPress developer so I was not familiar with where things might go wrong. My first intuition was to check the plugins, since not all WordPress plugins are well written and some are notorious for taking up a lot of resources. Unfortunately isolating plugin resource usage by instrumentation was not possible as far as I know, due to the way WordPress/PHP works. After comparing the set of plugins with another site which did not exhibit the same behaviour, I decided to try other approaches.

I tried the usual tricks, like enabling proxying in Cloudflare, using a caching plugin, upping the EC2 instance size and RDS instance size. I even added a robot.txt to prevent bots from crawling the site for the time being. Those tricks helped a little, but did not resolve the problem.

Using docker stats, I noticed that CPU and memory usage is extremely high for the container, compared to others. CPU consumption is often >100% with every page load and memory usage spiked to 14GB after a while. Another unusual sign is the size of the database. For a site with around 500 products, the database size is >600MB.

That is when I chanced upon this article when searching for the symptoms.

The problem WordPress sites can run into is when there is a large amount of autoloaded data in the wp_options table.

If you return anything below 1 MB you shouldn’t be worried. However, if the result was much larger, continue on with this tutorial.

I ran the query in the article and it returned the following.

Wait. The autoload_size is ~570MB (!). I wrote a SQL command to find all the options which are larger than 1MB.

The results range from 1MB all the way to 13MB.

For the uninitiated, wp_options is akin to Windows registry, and it has become a dumping ground for plugins to store values that they might need. Most of the values in this option should be configuration values (like siteurl) which should take up just a few bytes. wp_option also has a field “autoload” which states whether the option should be loaded on every page. Storing 13MB in an option value and setting it to autoload is just insane. The total size of autoload options in the table turns out to be >500MB. Every page load is querying >500MB of data from the database and processing those data. No wonder the site is crawling!

Inspecting those options shows them most of them have the prefix _transient, which means they can be safely deleted. After making a backup of the database, I deleted all transient options. wp_options went from 556MB to 46MB, a reduction of >90%. The total database size went from 645MB to 84MB, a reduction of >85%. Memory consumption also dropped by 20x (from ~14GB to ~700MB). More importantly, the site is now super fast which is extremely important for an e-commerce site.

The results are very telling from the RDS dashboard.

Average CPU utilization has dropped to <3% and average database connections is now near zero.

Aside from noticeable performance boost for the site – average page loads within 1s – another bonus from these optimizations is that we can now use smaller EC2 and RDS instance types for better cost savings. Hopefully this article is useful as a reference for others in similar situations.

Categories
cloud

Slashing Data Transfer Costs in AWS by 99%

Everyone knows how egress (outgoing traffic) is not free in AWS. This is a “hack” to save on egress cost when transferring traffic between AWS regions. And yes, you can achieve savings of 99% when using this method.

There are lots of ways to accidentally spend too much money on AWS, and one of the easiest ways is by carelessly transferring data. As of writing, AWS charges the following rates for data transfer: Data transfer from AWS to the public Internet ranges from $0.09/GB in us-east-1 (N. Virginia) to $0.154/GB in af-south-1 (Cape Town). Therefore a single terabyte of data transfer will run you a cool $90 – $154.

Source: Slashing Data Transfer Costs in AWS by 99%

Categories
cloud

Announcing Amazon Managed Service for Apache Flink Renamed from Amazon Kinesis Data Analytics | AWS News Blog

It seems like AWS is renaming some of their services to refer to the underlying open-source software by name. This makes sense when AWS is just running the underlying software for the customer without too much changes, like Amazon Managed Grafana, Amazon Managed Streaming for Apache Kafka.

https://aws.amazon.com/blogs/aws/announcing-amazon-managed-service-for-apache-flink-renamed-from-amazon-kinesis-data-analytics/

Today we are announcing the rename of Amazon Kinesis Data Analytics to Amazon Managed Service for Apache Flink, a fully managed and serverless service for you to build and run real-time streaming applications using Apache Flink.

Categories
cloud

“Amazon accounts”

As a long time Amazon and AWS user, I have accumulated more than a few Amazon-related accounts. Recently I also had to work with other colleagues who are not so familiar with the Amazon services and accounts ecosystem. Here is an attempt to make sense of it all:

 AmazonAWSAPNSSOAdhoc
RetailAmazon.com
Amazon Prime
Y
CloudAWS ConsoleY
EducationAWS AcademyY
TrainingAWS Training and CertificationYYY
TrainingSkill BuilderYYY
EventAWS JAMYYY
Mapping of services to accounts

Hopefully it helps someone who’s figuring out which account to login to which service.

Categories
cloud programming

Web Push for Web Apps on iOS and iPadOS | WebKit

This is good news as it further expands the capabilities of web apps. This addresses a longstanding request for web apps to deliver notifications. Note that web push only works if the web app is added to Home Screen. It is to limit web apps that aggressively ask for too many permissions.

With iOS and iPadOS 16.4 beta 1 comes support for Web Push for Home Screen web apps, Badging API, Manifest ID, and more.

Source: Web Push for Web Apps on iOS and iPadOS | WebKit

Categories
cloud sysadmin

New – Visualize Your VPC Resources from Amazon VPC Creation Experience | AWS News Blog

Finally. Amazon Web Services has released a new feature called Amazon Virtual Private Cloud (VPC) resource map, which simplifies the VPC creation experience in the AWS sonsole. This feature displays existing VPC resources and their routing visually on a single page, allowing users to quickly understand the architectural layout of the VPC.

The new VPC creation experience streamlines the process of creating and connecting VPC resources with just one click, even across multiple Availability Zones (AZs). The VPC resource map also allows users to quickly understand the architectural layout of the VPC, including the number of subnets, which subnets are associated with the public route table, and which route tables have routes to the NAT Gateway. Additionally, users can customize a Name tag per resource in the preview and easily change the default CIDR value and subnet mask. The Amazon VPC resource map is now available in all AWS Regions where Amazon VPC is available.

Categories
cloud network security

Tailscale

When I first know about Tailscale, I didn’t “get” it. I read that it is like VPN but not quite the same as your traditional VPN, but I don’t know the details. But since there are a lot of rave reviews from HN users I got curious. After trying it out, I am immediately sold. I have now installed it on all my personal devices.

Tailscale is a revolutionary new way of connecting devices together. Once setup – and it’s very easy to set up – your devices behave just like they are on the same network. No complicated VPN to setup, or persistent connection issues, or remembering IP addresses to access your devices. It just works.

Tailscale is akin to VPN what Dropbox is to file synchronizing.

Tailscale offers a wide range of benefits for businesses and individuals alike. One of the key benefits of Tailscale is that it allows users to access their networks and devices without the need for traditional VPN software. This means that users can access their networks and devices from any device, including smartphones, tablets, and laptops, without the need for additional software or configuration. This makes it extremely convenient for users who need to access their networks and devices while on the go.

Another benefit of Tailscale is that it offers top-of-the-line security. Tailscale uses state-of-the-art encryption to ensure that all data transmitted over the network is secure and protected from cyber threats. This makes it ideal for businesses and organizations that handle sensitive data and need to ensure that it is protected at all times.

The best part is Tailscale is extremely easy to use. It has a simple and intuitive user interface that makes it easy for users of all skill levels to set up and use.

I highly recommend trying it out to just to see how it works. Tailscale is free for personal use.